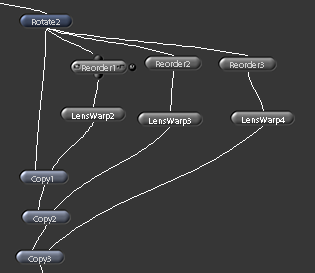
The only solutions readily available to remove the aberration involved the use of Photoshop. I was already using Shake to combine the stills into Quicktime and to make framing adjustments, so I decided to build a script to remove the aberration in Shake:

The solution is to separate each of the three color channels using a Reorder node and to then use a LensWarp node on each channel. Chromatic aberration occurs because the color channels have been focused on different planes. Typically the aberration is more extreme towards the edges of the frame. That's why a simple x/y adjustment on the different color channels doesn't work: the channels are offset by different amounts throughout the frame.
The LensWarp node will analyze the frame to find the optical center. From there, the 'factor' and 'kappa' parameters are used to make the distortion adjustments. The first image I worked on had blue and red fringing, so I decided to not touch the green channel, and instead make adjustments to the red and blue channels to match the green. I viewed the final Copy node while making the adjustments to the LensWarp node in order to be able to visually line up the channels. The fringing was so bad that it wasn't 100% removed (I believe this is because the blue channel was also significantly softer, and bled out even when it was properly aligned). The before and after is below.


Once a solution has been found for a lens/aperture combination, you can just save the script and (probably) not have to build it again.